Airgap Installation
There are 3 parts to deploy for the full Airgap AISec Platform experience:
- Airgap AISec Platform Consoles (Admin Console and Platform Console)
- Model Scanner CLI
- AIDR
Airgap AISec Platform Deployment
Download
Download the AISec Platform file and transfer it to the system where it will be deployed.
-
Run the following command in terminal. Replace
<License ID>with your license ID. For information about licenses, see Prerequisites. -
Transfer the file to the system where the AISec Platform will be deployed.
Install Admin Console
The Admin Console allows you to manage your controller and worker nodes used by the platform. The Admin Console is not the HiddenLayer Console UI (Platform Console).
About the Admin Console (Click to expand)
When the Admin Console is deployed, the following are created:
- Admin Console
- A controller node
Some Admin Console features include:
- Add new nodes
- Edit the platform configuration
- Use the troubleshooting feature to collect logs, resources, and other data to send to HiddenLayer for support
-
Open a terminal and unpack the installer file.
-
Install the the Airgap Platform and follow the on-screen instructions.
-
Set the Admin Console password. This password will be used to login to the Admin Console in the next step.
-
Navigate to the outputted URL to login the Admin Console.
Admin Console Setup
After logging in to the Admin Console, follow the onscreen instructions to complete setup and installation of the HiddenLayer Airgap Platform.
-
Choose what certificate to use, then click Continue.
- Self-signed: The installer will create a private key and SSL certificate. Can be used for testing.
- Upload your own: You need to upload a private key and an SSL certificate. Recommended for production.
- Hostname (optional)
-
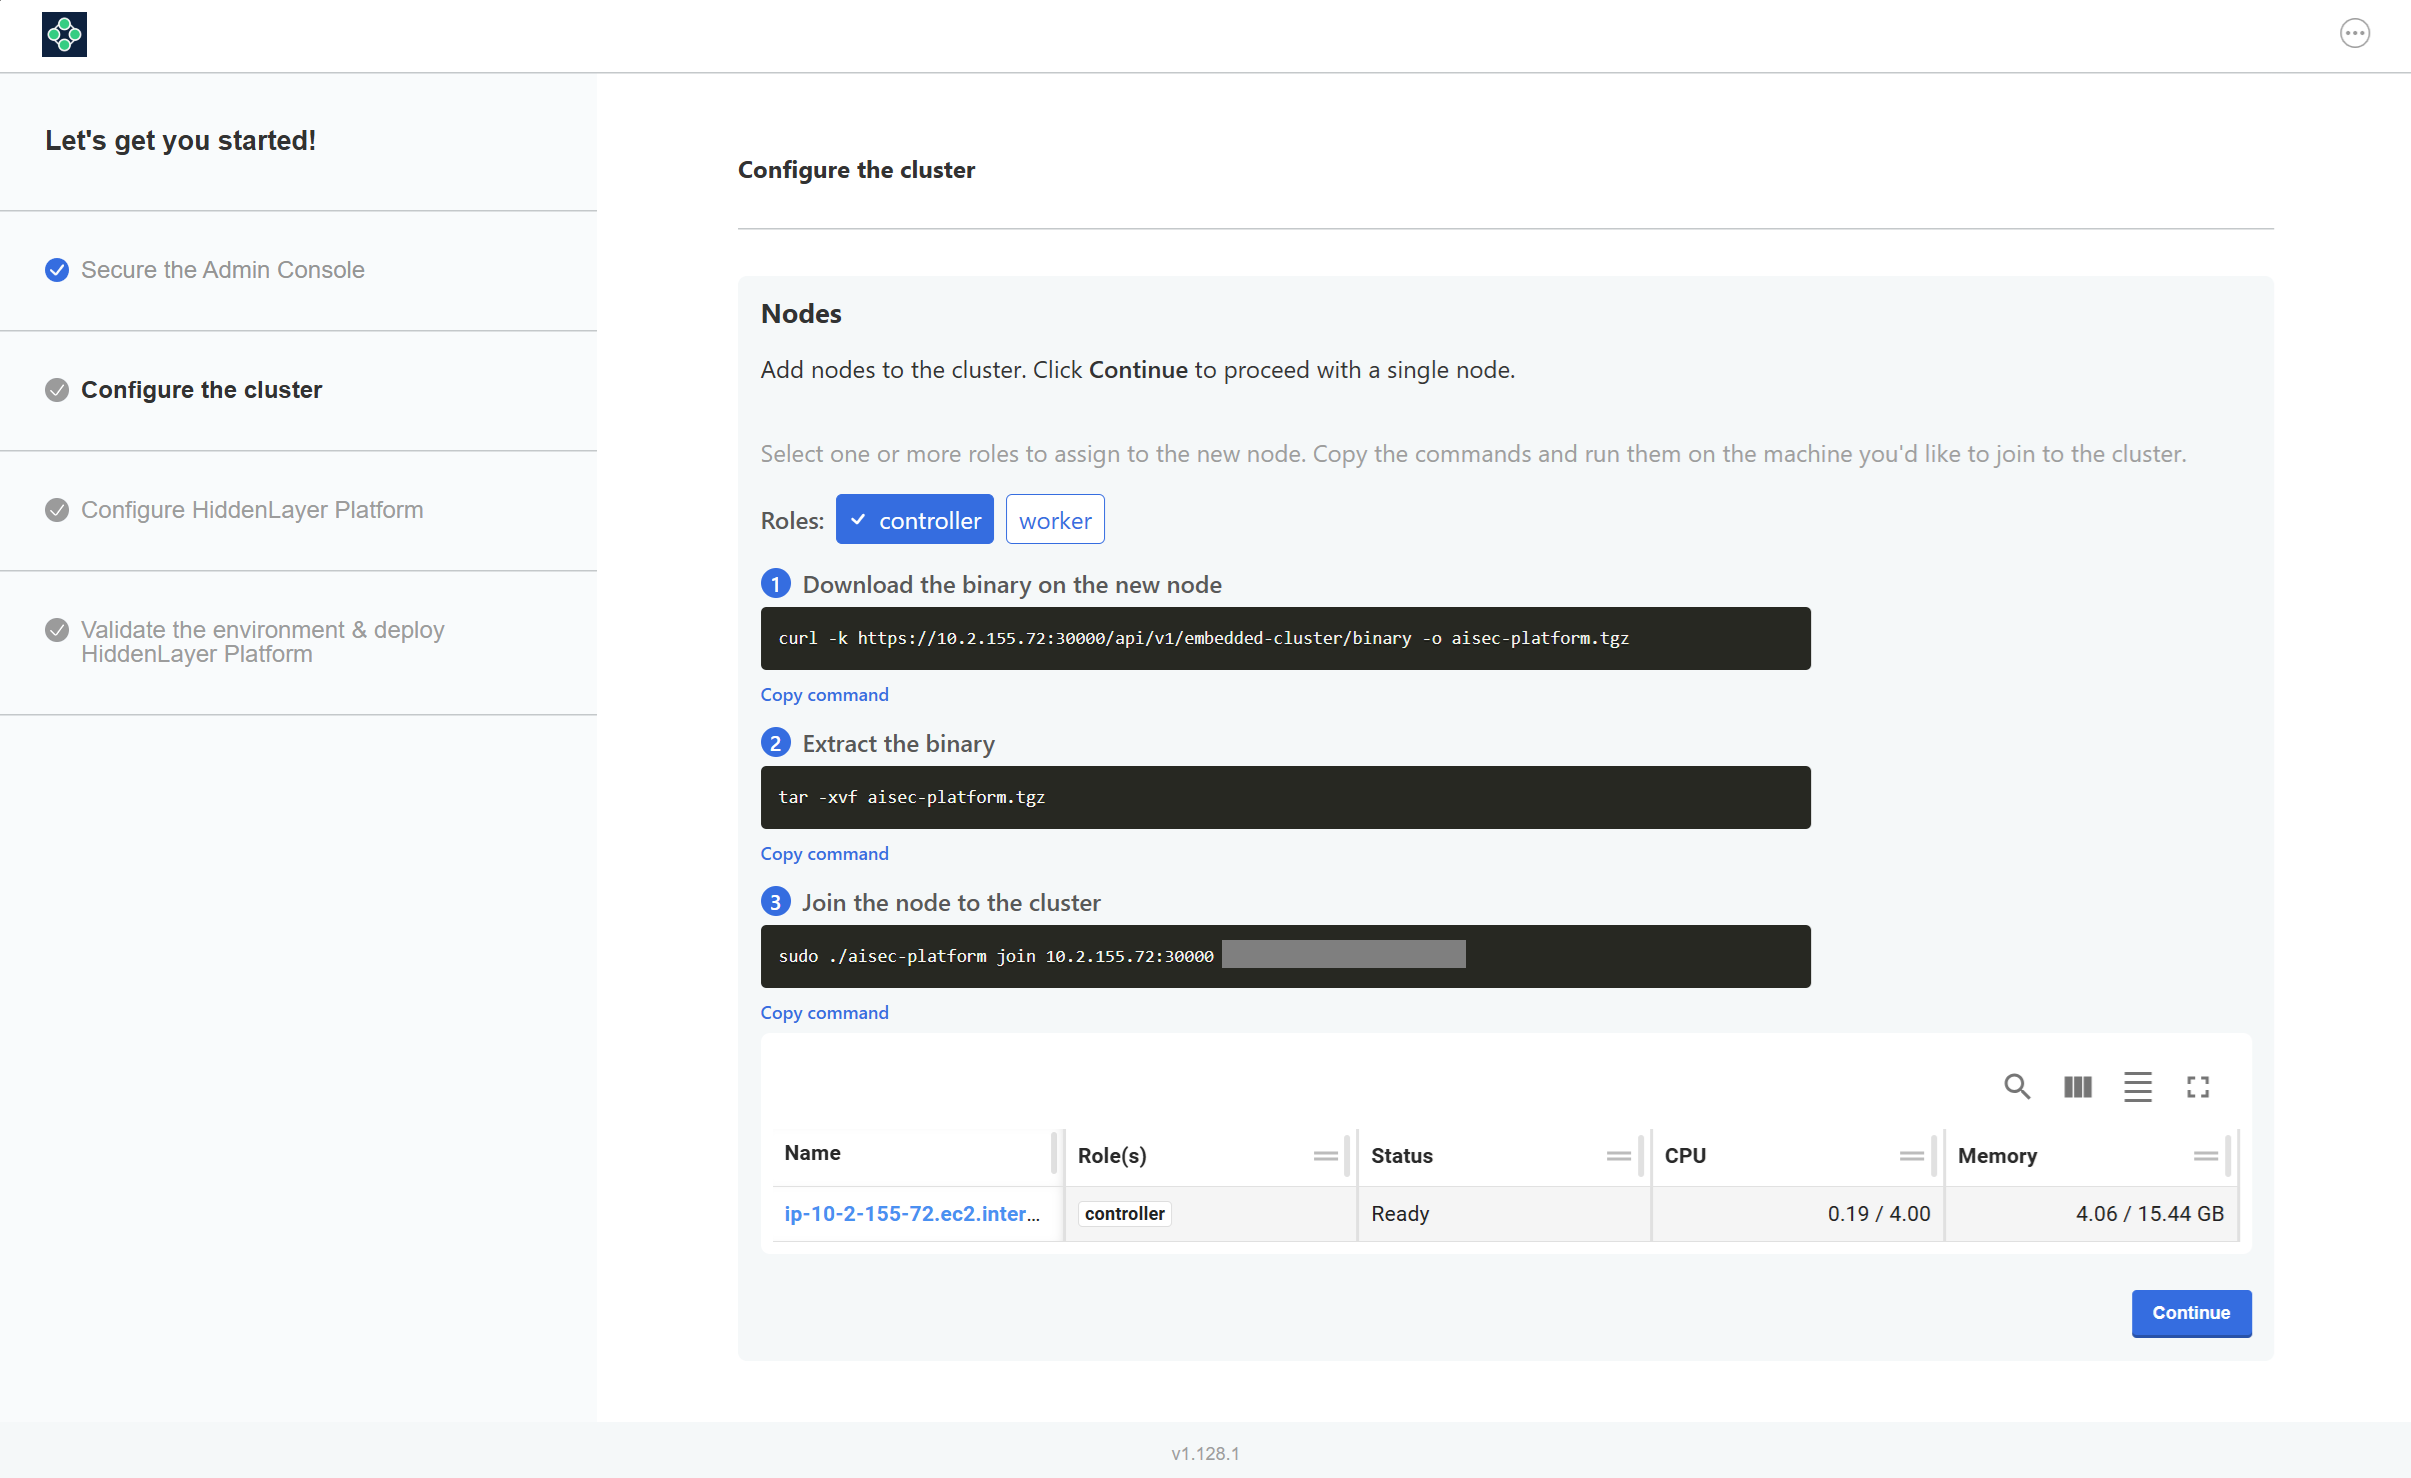
Configure the cluster, then click Continue.
- Note: The initial deployment of the Admin Console includes one controller node.
-
Add more controller and worker nodes to meet your organization's requirements.
- To add a controller, select controller and deselect worker. Use the commands on the systems to run the controller nodes.
- To add a worker node, select worker and deselect controller. Use the commands on the systems to run the worker nodes.
- Do not install a controller and worker on the same system.
-
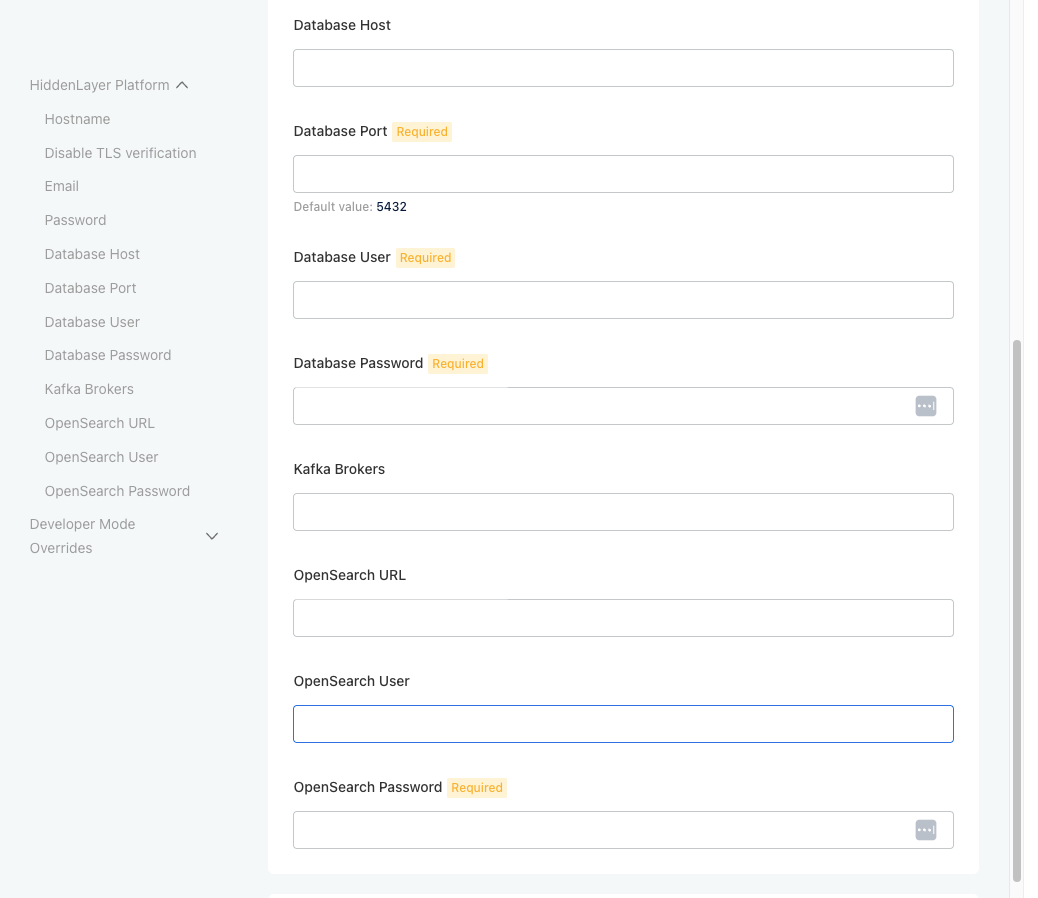
Configure HiddenLayer Platform. The following steps describe each configuration field.
Notes
- Some fields appear when a value is entered into the parent field, such as Database Host or OpenSearch URL.
-
Leaving the fields blank for Database Host, Kafka Brokers, and OpenSearch URL will cause the installer to enter “Sandbox Mode” and use embedded services.
- Sandbox Mode is for testing and POC purposes only, it is not meant to be used for production purposes.
-
Hostname
- This hostname will be used to login to the Platform Console.
-
Disable TLS verification
- Enable this option if using a self-signed certificate.
- This option should not be enabled if using your own certificate.
-
Email
- This email will be the user name to login to the Platform Console.
- The initial user created is an Administrator for the Platform Console.
-
Password
- This password is for the initial user login.
- The password must be a minimum of 8 characters and a maximum of 256.
-
Database Host
- Example:
your.database.hostname.com -
When you enter a hostname, other database fields display. Enter the required information.
-
Database Port
- Example:
5432
- Example:
-
Database User
- Database Password
-
- Example:
-
Kafka Brokers
- The broker entries can be entered as comma separated values.
- Example:
broker-1.your.kafka.domain.com:9092, broker-2.your.kafka.domain.com:9092,
-
OpenSearch URL
- Example:
https://your.opensearch.hostname.com:443 -
When you enter a URL, other Kafka fields display. Enter the required information.
- OpenSearch User
- OpenSearch Password
- Example:
-
Click Continue.
Validate the environment & deploy HiddenLayer Platform
After the initial setup is complete, you will be re-directed to the Admin Console.
- The Airgap AISec Platform will take time to complete installation after the package is deployed.
- The Platform Console will be accessible when the status changes to “Ready” as seen in the Admin Console.

Platform Console - API Key
To run Model Scanner CLI and AIDR, you need an API client ID and client secret. These are created in the Platform Console.
- Log in to the Platform Console. Enter the email and password you used during the Admin Console Setup, or enter your email and password provided by your Platform Console administrator.
-
In the side navigation, click Admin.

-
Click API Keys (upper-right).
-
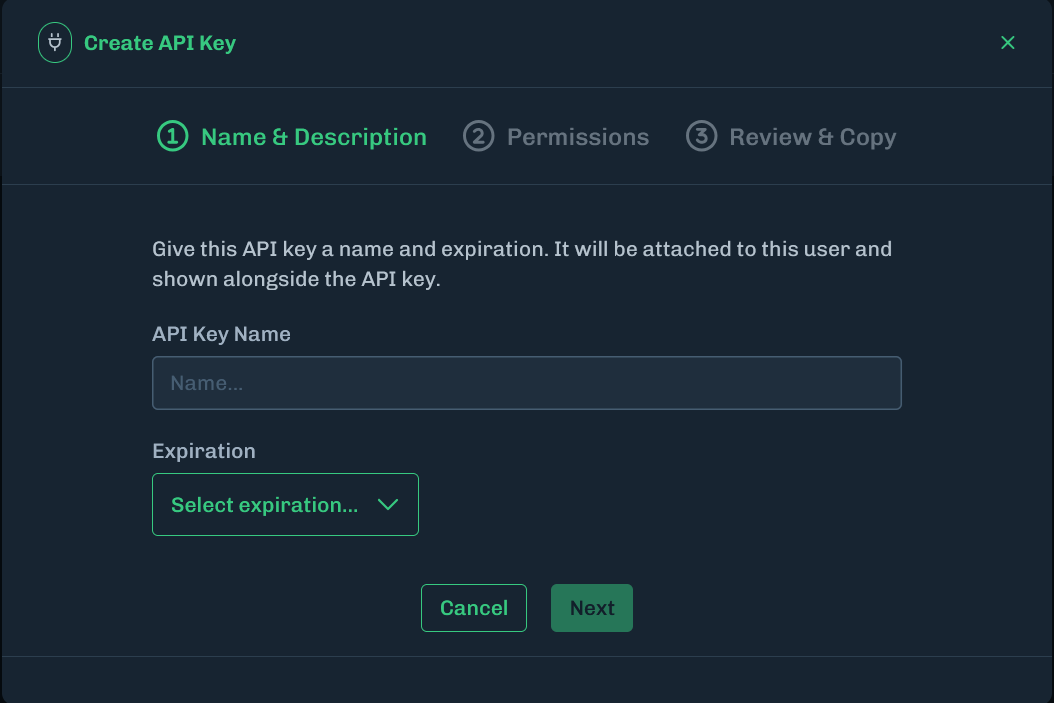
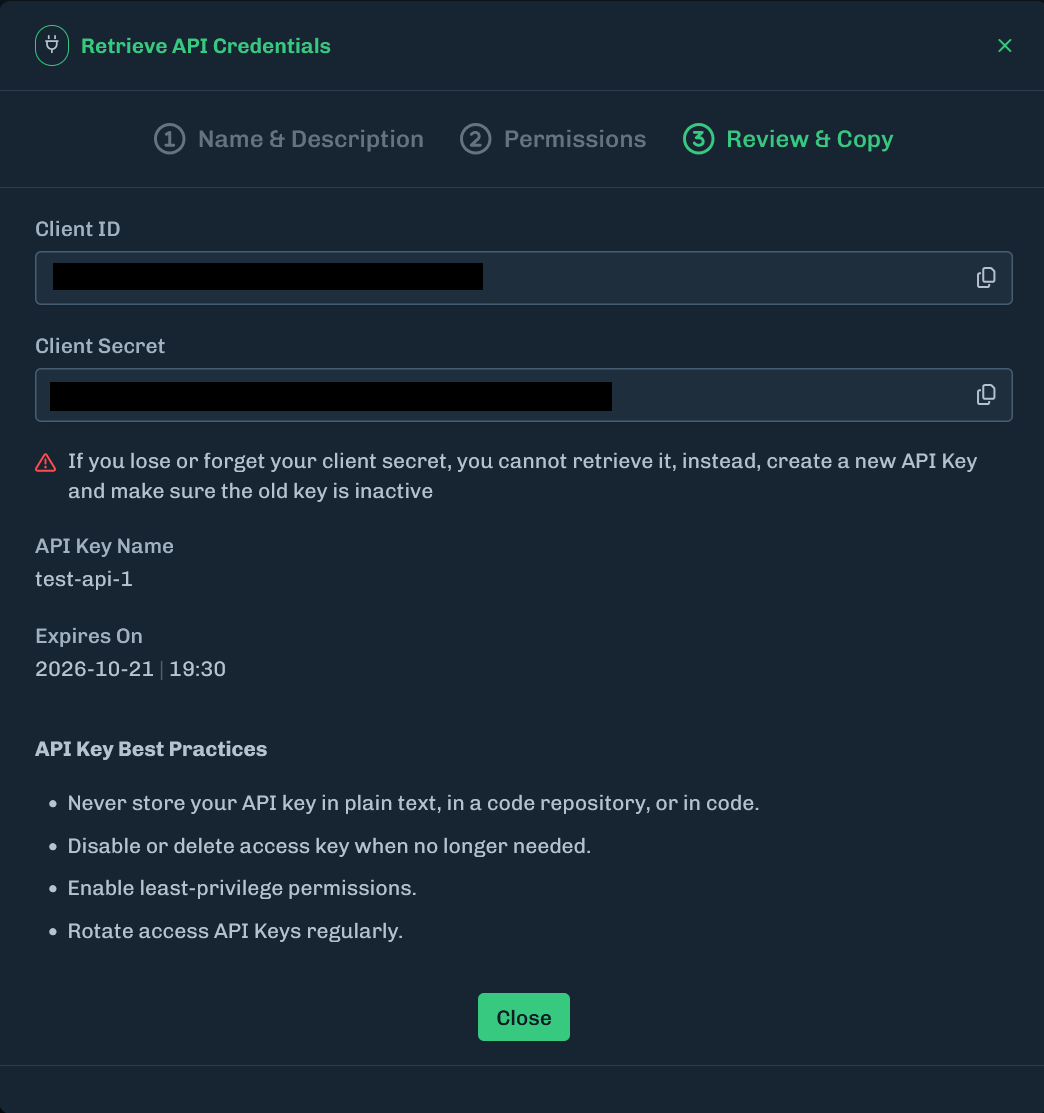
Click New. A Create API Key window displays.
-
Enter a name for the API key, then select an expiration from the drop-down menu.
- Click Next.
-
Select the permissions for this API key. See API Keys for details about API key permissions.
-
For Model Scanner CLI, enable the following permissions:
- Model Inventory: Read, Write
- Model Scanner: Write
-
For AIDR, enable the the following permissions:
- Inferences: Read, Write
-
-
Click Create API Key. Copy the Client ID and Client Secret for future use. The Client Secret is only visible when creating an API key. You cannot retrieve or view the Client Secret after you close this window.
Model Scanner CLI
Model Scanner CLI is a container image that can be downloaded and ran via Docker.
For prerequisites, including licenses, see Prerequisites.
Download
Download the Model Scanner CLI file and transfer it to the system where it will be deployed.
-
Authenticate using
docker login.- The user name is the Registry username.
- The password is the License ID.
- For information about licenses, see Prerequisites.
-
Pull the HiddenLayer image.
-
Tag the image for your private registry.
-
Push the airgapped image to your private registry. Note: Make sure you are logged in to your private registry in order to push the image.
Note
You will run the Model Scanner CLI after you deploy the AISec Platform and create an API key.
Running Model Scanner CLI
-
Export your HiddenLayer information (product license, API key, and API secret).
HiddenLayer Information Descriptions (Click to expand)
- Replace
%HIDDENLAYER_LICENSE%with your HiddenLayer license. - Replace
%HL_API_KEY%and%HL_API_SECRET%with your HiddenLayer API client ID and client secret, generated in the Platform Console. - Replace
%HIDDENLAYER_PLATFORM_HOSTNAME%with the URL for your Console. Example:http://server1.test.hiddenlayer.com. - For Windows, replace
exportwithset. - For information about licenses and keys, see Prerequisites.
- Replace
-
Run the Model Scanner command.
Model Scanner Command Descriptions (Click to expand)
- Replace
$(directory)with the path on the local machine where models to be scanned are located. Example:/Users/username/Downloads. - To scan a specific file in the folder, update
--input /files-to-scanwith the file name. Example:--input /files-to-scan/test_model.pkl. - Replace
<location of model scanner cli in local registry>with the location of the Model Scanner image. - Example for Docker image:
images.hiddenlayer.ai/proxy/aisec-platform/ghcr.io/hiddenlayer-engineering/modelscanner-src:airgapped - Replace
$model_namewith either the name of an existing model from the inventory (to add a new scan version to the existing model) or a new, unique name (to create a new model entry in the inventory). Example:Test Scan. - Using
--persistadds the scan results to an existing model in the AISec Platform Console. - In the following example,
jqis used to make the output more readable. Remove| jqif you do not want to use jq.
- Replace
-
The scan results display in the terminal or command prompt. You can also log in to the Platform Console to view the scan results.
- For more information about Model Scanner CLI command-line arguments, for input and output, see Command-Line Arguments
Model Scanner Sample Output (Click to expand)
The following is an example output for a Model Scanner CLI scan using a terminal or command prompt.
{
  "scan_id": "eadcb851-bf57-4e57-acbe-c3e7fededd44",
  "start_time": "2025-10-24T21:08:51.96Z",
  "end_time": "2025-10-24T21:08:52.222Z",
  "status": "done",
  "version": "25.9.0",
  "$schema_version": "3.2.0",
  "inventory": {
    "requested_scan_location": "/files-to-scan/test_model_safe.pkl",
    "model_id": "00000000-0000-0000-0000-000000000000",
    "model_name": "test scan 01",
    "model_version": "1761340131",
    "model_version_id": "00000000-0000-0000-0000-000000000000"
  },
  "file_results": [
    {
      "file_instance_id": "0854d4a0-3acf-4e15-b3b5-63090bfd218a",
      "file_location": "/files-to-scan/test_model_safe.pkl",
      "status": "done",
      "start_time": "2025-10-24T21:08:51.96Z",
      "end_time": "2025-10-24T21:08:52.222Z",
      "details": {
        "sha256": "bce834158f08706277377c50226e31b74e372770fe26fc5bdb4ff74de9924ffa",
        "file_type": "pickle",
        "file_type_details": {
          "pickle_header": {
            "pickle_version": "3",
            "type": "pickle"
          },
          "pickle_modules": [
            "sklearn.pipeline.pipeline",
            "sklearn.preprocessing._data.standardscaler",
            "callable: numpy.core.multiarray.scalar",
            "callable: numpy.dtype",
            "callable: numpy.core.multiarray._reconstruct",
            "numpy.ndarray",
            "lightgbm.sklearn.lgbmclassifier",
            "lightgbm.basic.booster",
            "callable: collections.defaultdict",
            "collections.ordereddict",
            "sklearn.preprocessing._label.labelencoder"
          ],
          "subtype": [
            "numpy",
            "scikit"
          ]
        },
        "estimated_time": ""
      },
      "seen": "2025-10-24T21:08:51.96Z",
      "detections": []
    }
  ],
  "detection_count": 0,
  "file_count": 1,
  "files_with_detections_count": 0,
  "summary": {
    "detection_count": 0,
    "file_count": 1,
    "severity": "safe",
    "files_with_detections_count": 0,
    "files_failed_to_scan": 0,
    "unknown_files": 0
  }
}
AIDR
Deployment for AIDR requires downloading and deploying as a container to a Kubernetes cluster.
For prerequisites, including licenses, see Prerequisites.
Download Helm Chart
The following information is required to download and use AIDR:
-
Run the following command in a terminal to log in to the HiddenLayer registry.
- The
usernameis your Registry username. - The
passwordis your License ID. - For more information, see Prerequisites.
- The
-
Pull the helm chart. This command will download a helm chart into the working directory with a file name of:
distro-enterprise-aidr-genai-installer-2.1.0.tgz. -
Store the downloaded chart on the system where you will deploy AIDR from.
Download AIDR Images
Run the following commands in the terminal to download the AIDR images.
-
Run the following command in a terminal to log in to the HiddenLayer image registry.
- The
usernameis your Registry username. - The
passwordis your License ID. - For more information, see Prerequisites.
- The
-
Run each of the following commands to pull the images.
docker pull --platform linux/amd64 images.hiddenlayer.ai/proxy/aidr-genai/ghcr.io/hiddenlayer-engineering/distro-enterprise-aidr-genai-installer:installer-2.1.0 docker pull --platform linux/amd64 images.hiddenlayer.ai/proxy/aidr-genai/ghcr.io/hiddenlayer-engineering/preview-enterprise-aidr-genai:25.10.0 docker pull --platform linux/amd64 images.hiddenlayer.ai/proxy/aidr-genai/ghcr.io/hiddenlayer-engineering/replicated-sdk-image:1.8.1 docker pull --platform linux/amd64 images.hiddenlayer.ai/proxy/aidr-genai/ghcr.io/hiddenlayer-engineering/replicated-license-enforcer:0.6.0 -
Tag the images to a private registry. Replace
%YOUR-REGISTRY%with your private registry information.docker tag images.hiddenlayer.ai/proxy/aidr-genai/ghcr.io/hiddenlayer-engineering/distro-enterprise-aidr-genai-installer:installer-2.1.0 %YOUR-REGISTRY%/hiddenlayer-engineering/distro-enterprise-aidr-genai-installer:installer-2.1.0 docker tag images.hiddenlayer.ai/proxy/aidr-genai/ghcr.io/hiddenlayer-engineering/preview-enterprise-aidr-genai:25.10.0 %YOUR-REGISTRY%/hiddenlayer-engineering/preview-enterprise-aidr-genai:25.10.0 docker tag images.hiddenlayer.ai/proxy/aidr-genai/ghcr.io/hiddenlayer-engineering/replicated-sdk-image:1.8.1 %YOUR-REGISTRY%/hiddenlayer-engineering/replicated-sdk-image:1.8.1 docker tag images.hiddenlayer.ai/proxy/aidr-genai/ghcr.io/hiddenlayer-engineering/replicated-license-enforcer:0.6.0 %YOUR-REGISTRY%/hiddenlayer-engineering/replicated-license-enforcer:0.6.0 -
Push the images to a private registry. Replace
%YOUR-REGISTRY%with your private registry information. Note: Make sure you are logged in to your private registry before pushing the images.docker push %YOUR-REGISTRY%/hiddenlayer-engineering/distro-enterprise-aidr-genai-installer:installer-2.1.0 docker push %YOUR-REGISTRY%/hiddenlayer-engineering/preview-enterprise-aidr-genai:25.10.0 docker push %YOUR-REGISTRY%/hiddenlayer-engineering/replicated-sdk-image:1.8.1 docker push %YOUR-REGISTRY%/hiddenlayer-engineering/replicated-license-enforcer:0.6.0
AIDR: Config.yaml
To deploy AIDR, a config.yaml file must be generated with the appropriate settings.
The following is needed for the config.yaml file:
-
HiddenLayer Platform Hostname
- This is the hostname you will use for the Airgap AISec Platform.
-
Client ID and Client Secret
- These can be generated under in the Platform Console, go to Admin > API Keys.
-
Provider information and credentials
- Providers include OpenAI, OpenAI Azure, Gemini, Anthropic, and AWS.
Note
A Client ID and Secret are only required when connecting AIDR to the Airgapped Platform.
-
Set “type” in the config.yaml to “disabled” to install AIDR without connecting to the Airgapped Platform.
- Set “type” to “hybrid” to install AIDR and connect to the Airgapped Platform.
-
If AIDR has already been installed, change the “type” value in the config.yaml and run a helm upgrade command.
Example config.yaml File (Click to expand)
global:
  proxy: <private registry hostname>
  registry: <private registry namespace>
  imagePullSecrets:
    - <name of existing image pull secret>
  ## If the HiddenLayer Platform is configured to use your own certificate,
  ## specify the certificate below so AIDR can communicate with the Platform.
  # ssl:
    # ca_bundle:
      ## Specify the cerificate contents directly inline
      # contents: |-
      #   -----BEGIN CERTIFICATE-----
      #   <REPLACE WITH CERTIFICATE HASH>
      #   -----END CERTIFICATE-----
      ## Alternatively, specify a path to the certifcate.
      ## `host_path` is file path on the underlying k8s worker node in the cluster where private certificate authorities (CA) may be defined
      ## use this config setting if you setup your k8s worker nodes to contain your CAs directly on their file system
      ## when this config is specified, the CA file is mounted into the AIDR container and it is configured to trust certs from that CA
      # host_path: <example: /etc/ssl/certs/ca-certificates.crt>

aidr_genai:
  ## Replace '<HiddenLayer Platform Hostname>' in the base-url fields with desired url.
  ## This url should be the hostname defined for your airgapped Platform Console.
  platform:
    api-connection:
      base-url: "https://<HiddenLayer Platform Hostname>"
      max-retry-count: 3
      ## Set type: disabled to install AIDR without a connection to the Platform.
      ## If AIDR is deployed and you want to change the type, update this yaml file, then run a helm upgrade command.
      type: "hybrid"
    auth-n:
      base-url: "https://<HiddenLayer Platform Hostname>/oauth2/token"
      # client-id and client-secret are obtained from the Hiddenlayer Platform Console > Admin > API Keys
      client-id:
      client-secret:

  proxy:
    log-level: "info"

    request:
      default-requester: "unknown"
      max-size-in-bytes: 1000000

    response:
      max-size-in-bytes: 1000000

    device:
      type: "cpu"  # cuda
      datatype: "fp32"

    security-degradation:
      enable-unsecured-stream-requests: true
      enable-unsecured-reverse-proxy-routes: false
      enable-rule-override-request-headers: false
      enable-remote-configuration: false

    secrets-manager:
      - source:  # aws | azure
        url:
        secrets:
          ## a mapping of AIDR-G setting names to secret names in the manager, e.g.:
          # HL_LICENSE: "arn:aws:secretsmanager:us-east-1:545009838560:secret:HL_LICENSE-ogIwCH"

    provider:
      timeout-in-seconds: 600

      openai:
        default-model:
        base-url:  # "https://api.openai.com"
        api-key:

      openai-azure:
        base-url:
          scheme:  # "https"
          host:  # ".openai.azure.com"
        api-key:

      openai-tgi-variants:
        #- provider-name:
        #  endpoint-name:
        #  base-url:
        #  api-key:

      openai-custom-routes:
        #- provider-name:
        #  route-prefix:
        #  base-url:
        #  enrich-response:
        #  api-key:

      azure:
        base-url:  # "https://"
        region:  # "eastus"
        tenant-id:
        client-id:
        client-secret:

      gemini:
        base-url:  # "https://generativelanguage.googleapis.com"
        api-key:

      anthropic:
        base-url:  # "https://api.anthropic.com"
        version:  # "2023-06-01"
        api-key:

      aws:
        region:  # "us-east-1"
        enable-instance-profile-credentials: false
        credential-provider: "instance"  # container

        sagemaker:
          base-url:  # "https://runtime.sagemaker.{region}.amazonaws.com"

        bedrock:
          base-url:  # "https://bedrock-runtime.{region}.amazonaws.com"

        credentials:
          #- name:
          #  access-key-id:
          #  secret-access-key:
          #  session-token:
          #  region:
          #  sagemaker-base-url:
          #  bedrock-base-url:

  detector:
    engine:
      chat-context-window: "last"  # full
      log-chat-context: true

      on-block:
        message: "Message was blocked."
        include-reason: true

      modalities:
        - type: "image"
          severity: "medium"
          on-alert:
            proxy-action: "allow"  # block
        - type: "tool-use"
          severity: "medium"
          on-alert:
            proxy-action: "allow"  # block

    prompt-injection:
      enabled: true
      severity: "high"
      scan-type: "full"
      batching:
        max-count: 10
      on-alert:
        proxy-action: "allow"  # block
      overrides:
        #- name:
        #  action: "suppress-alert"  # generate-alert
        #  match:
        #    value:
        #    type: "substring"

    personally-identifiable-information:
      enabled: true
      severity: "medium"
      entity-exclusions:
      on-alert:
        proxy-action: "allow"  # block, redact
        redaction-type: "replace-with-entity"  # replace-with-redacted
      overrides:
        #- name:
        #  action: "suppress-alert"  # generate-alert
        #  match:
        #    value:
        #    type: "regex"
      scope:
        input:
          # enabled:
          # entity-exclusions:
          # on-alert:
          #   proxy-action:
          #   redaction-type:
        output:
          # enabled:
          # entity-exclusions:
          # on-alert:
          #   proxy-action:
          #   redaction-type:

    code:
      enabled: true
      on-alert:
        proxy-action: "allow"  # block
      timeout:
        in-seconds: 0
        is-detection: true
      scope:
        input:
          # enabled:
          # on-alert:
          #   proxy-action:
        output:
          # enabled:
          # on-alert:
          #   proxy-action:

    url:
      enabled: true
      scope:
        input:
          # enabled:
        output:
          # enabled:

    denial-of-service:
      enabled: true
      severity: "high"
      token-threshold:
      on-alert:
        proxy-action: "allow"  # block

    guardrail:
      enabled: true
      severity: "low"
      classifier:
        refusal:
          enabled: true
      on-alert:
        proxy-action: "allow"  # block

    language:
      enabled: false
      severity: "medium"
      allowed-languages:
        # - EN
        # - ES
      on-alert:
        proxy-action: "allow"  # block
Install
-
Create a config.yaml file to customize installation
- See above for an example config.yaml file.
-
Run the following command to deploy AIDR.
Known Issue
There is a known issue for where provider credentials for AWS are not utilized when using the config.yaml file.
- Environment variables cannot be used with the installer to set AWS credentials.
-
Work around: Add an Authorization header in the request to the LLM Proxy.